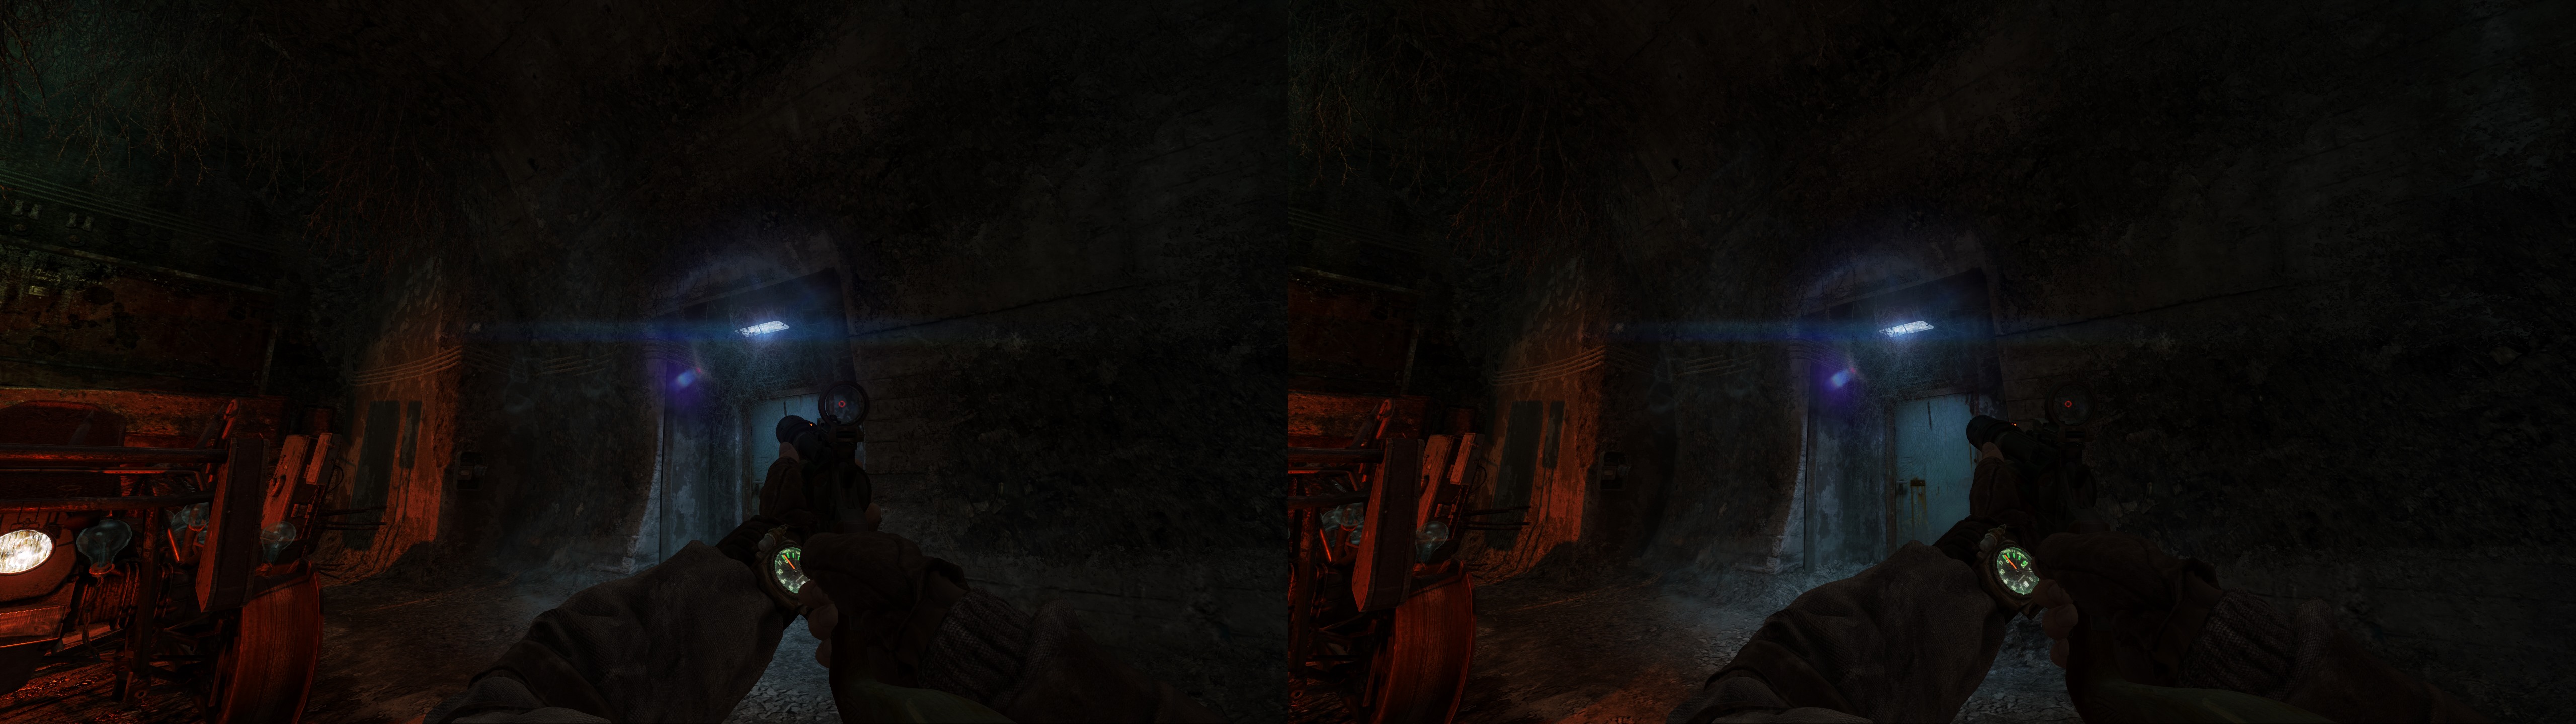
This is a remastered of the old game....a classic. Good old memories :)
Gameplay is the same, but with some visual improvements.
Also this game is almost 3Dvision ready out of the box (YES...shadows, lights and even reflections are working fine)....i fix a few stuff.
Fix:
- Skybox & Clouds
- Ghosts-Spooky character positions (without the fix there are in the wrong position)
- HUD
TB and SBS Mode:
- The game support SBS/TB Mode using 3Dmigoto. Remove the ";" in the ;run = CustomShader3DVision2SBS in the [Present] section of the d3dx.ini. Default TB Mode. F11 to cycle.
- Workaround (Crash) for win10 add in the ini.
Instructions:
- Extract where Vince.exe is located (\Voodoo Vince Remastered)
- Start the game, when "Rundll32" prompt appear, press "Yes". This is for the Profile Override.
Download
Screenshots
Read this topic about How i will release my fixes: HERE
** Do you like the fix? **
If you like the fix, you can donate to this PAYPAL account: dhr.donation@gmail.com
Thanks!

Monday, May 22, 2017
Sunday, May 21, 2017
NBA Playgrounds (DX11)
Fix:
- Shadows/ Lights
- Decals
- Halos in effects
- Water
TB and SBS Mode:
- The game support SBS/TB Mode using 3Dmigoto. Remove the ";" in the ;run = CustomShader3DVision2SBS in the [Present] section of the d3dx.ini. Default TB Mode. F11 to cycle.
- Workaround (Crash) for win10 add in the ini.
Settings:
- Use Highest quality
Instructions:
- Extract where NBAPlaygrounds-Win64-Shipping.exe is located (\NBA Playgrounds\NBAPlaygrounds\Binaries\Win64)
- Start the game, when "Rundll32" prompt appear, press "Yes". This is for the Profile Override needed for this game.
Download
Screenshots
Read this topic about How i will release my fixes: HERE
** Do you like the fix? **
If you like the fix, you can donate to this PAYPAL account: dhr.donation@gmail.com
Thanks!
Friday, May 19, 2017
Shock Tactics [DX11]


Game is a funny combination of the XCOM and Minecraft (it's sarcasm). May be 3D Vision will make it better...
Use <TAB> key to enable/disable fog of war
Installation:
Use <TAB> key to enable/disable fog of war
Installation:
- Download this ZIP file and extract the contents into the game directory.
- In your Steam library, right click on "Shock Tactics" and select "Properties"
- Click "Set Launch Options"
- In the box, type " -window-mode exclusive" and click "Ok"
- If you use not steam version in desktop shortcut's properties in object field add " -window-mode exclusive" after 'ShockTactics.exe'.
I made this using DarkStarSword's Unity template.
If you like this mod, please consider supporting DarkStarSword on Patreon
If you like this mod, please consider supporting DarkStarSword on Patreon
BlazBlue: Calamity Trigger - Continuum Shift Extend - Chronophantasma Extend


This 3D Vision fix puts character sprites and other effects at the depth they should be, instead of being fixed at screen depth, which was wrong unless you set convergence to a high and specific amount.
Update: according to user DAT-13 from the GeForce forums, the fix works with Continuum Shift Extend and Chronophantasma Extend. I made the fix with Calamity Trigger and I still don't have the other games. I'll check them when I buy them just in case.
Update 2: I have checked personally that Continuum Shift Extend works. Alternative fix uploaded.
Update 2: Fixed Chronophantasma Extend. I have uploaded a different fix for it.
Update 3 (2017-05-19): Updated the Chronophantasma Extend fix. Now it has all dynamic depth features of the Centralfiction fix, but most of the HUD remains at screen depth. Use this fix for the three games.
Fixed:
- All characters and their effects at depth, depending on separation and convergence. They are correct at all distances (19 manually programmed depth steps).
- Instant Block wave effect, now at the same depth as the characters.
- Arakune invisibility.
- Character reflections on the floor, that were at screen depth. Same depth as the other sprites now.
- Izayoi character effect and green bar in practice mode that needed sprite depth (Chronophantasma Extend), but without breaking part of the HUD.
Hotkeys:
- F1: low convergence. Can be overwritten with ctrl+F7 after loading this preset.
- F2: just enough convergence to have characters at screen depth. Can be overwritten with ctrl+F7 after loading this preset.
- For Chronophantasma Extend, there are F1, F2 and F3 hotkeys. The old F1 and F2 are now F1 and F3, while F2 is a value in the middle.
Download link (Chronophantasma Extend updated at 2017-05-19. Use that fix for the first three games. Its added shaders shouldn't break CT and CSE):
- Normal version: https://s3.amazonaws.com/masterotaku/Blazblue+Calamity+Trigger/Blazblue_CT_3D_Vision_fix_3.zip
- Alternative version: https://s3.amazonaws.com/masterotaku/Blazblue+Calamity+Trigger/Blazblue_CT_3D_Vision_fix_3_alternative_v2.zip
- Blazblue Chronophantasma Extend: https://s3.amazonaws.com/masterotaku/Blazblue+Calamity+Trigger/Blazblue_CPEX_3D_Vision_fix.zip
The normal version has all HUD/UI at screen depth. However, the main HUD/UI shader is responsible of some effects, like Hakumen circle symbols or some special effects of Tsubaki Yayoi, and they will be at screen depth.
The alternative version fixes those effects, putting them at the same depth as the sprites. But as a side effect, some other UI elements are at that depth, looking a bit weird compared to the rest of elements at screen depth. Everything is OK in battle or when you use the F2 convergence preset.
I couldn't get texture hunting to work with this fix, so you will have to decide which version of the fix you will use.
Instructions:
- Unzip the contents of the fix in the root folder of the game, which is "BlazBlue Calamity Trigger", "BlazBlue Continuum Shift Extend" or "BlazBlue Chronophantasma Extend".
- Play the game.
I recommend playing these games at 1280x768. That's the correct internal resolution and aspect ratio the game should use. 16:9 resolutions are stretched, and anything other than 1280x768 is just an upscale (internal resolution doesn't go any higher than that).
You can also force 4x4 supersampling in the drivers. It's necessary to play at 1280x768 to see the antialiasing effect.
For Chronophantasma Extend, in Nvidia Profile Inspector, set "Antialiasing - Mode" to "Enhance the application setting" and "Antialiasing - Transparency Supersampling" to "8x Sparse Grid Supersampling", and don't use a "Lower HUD" value of less than "6" in the ingame display options.
Sunday, May 14, 2017
Shadowrun Hong Kong Extended Edition [DX11]

Tested on version 3.1.2
Use <TAB> key to change 10 values of HUD depth
Use <F11> to toggle between 3Dvision, side-by-side and top-bottom
Installation:
- Download this ZIP file and extract the contents into the game directory.
- In your Steam library, right click on "Shadowrun Hong Kong" and select "Properties"
- Click "Set Launch Options"
- In the box, type " -force-d3d11" and click "Ok"
- If you use not steam version in desktop shortcut's properties in object field add ' -force-d3d11' after 'SRHK.exe'.
P.S. It's better to play on maximal zoom level for more valuable 3D effect
Alan Wake


- Enable convergence changing in Nvidia Control panel
- Launch game
- Go to Options/Controls/FOV and set directly to 17 bars enabled (3 bars disabled)
- Set separation (via Ctrl+F3 and Ctrl+F4 by default) to enabled 12 bars (20% in value) - it's more than necessary for valuable 3d effect (it's seems to me that nvidia driver has wrong settings of separation levels for this game)
- Set desirable level of convergence via (Ctrl+F5 and Ctrl+F6 by default)
P.S. This version of game doesn't need helix fix - it's tweak guide
Saturday, May 13, 2017
The Elder Scrolls Online - 3D Vision Fix
3D Vision Fix by mike_ar69, Helifax
=======================================
DX11 Update for Homestead DLC
=======================================05/13/2017 - v2
This updated fixes issues introduced by the Homestead DLC (it bascially broke the entire fix).
1. Delete the previous helixmod or DX11 fix (if you have it)
2. Download this file and unzip it into this location:
<root folder>:\SteamLibrary\SteamApps\common\Zenimax Online\The Elder Scrolls Online\game\client
3. Open up the d3dx.ini file and modify params to your liking.
11/6/2016 - v1
We are providing a DX11 fix for this game, since the game is now only available in DX11. This is a 3DMigoto fix, not a helixmod fix. You should:
1. Delete the previous helixmod fix (if you have it)
2. Download this file and unzip it into this location:
<root folder>:\SteamLibrary\SteamApps\common\Zenimax Online\The Elder Scrolls Online\game\client
3. Open up the d3dx.ini file and modify params to your liking:
Default values (in ini file) - Modify to your liking:
- [Constants]
- ; UI depth
- x = 0.2
- ; Crosshair depth
- y = 0.7
Key Shortcuts:
- ; 3rd person convergence
- [Key1]
- Key = [
- convergence = 2.7
- ; First person convergence
- [Key2]
- Key = ]
- convergence = 0.5
- ; Enable crosshair filtering - Useful in some menus.
- [Key3]
- Key = \
- w = 1.0
- type = toggle
Things fixed:
- Shadows
- Lights
- Skybox
- Cross hair depth toggle
Known problems
This is a relatively quick fix, and there are outstanding issues, so please report problems as you find them
- Some shadows might not be fixed yet, we only tested certain areas of the game
- There are the same issues with 'glowy lights' that the original DX9 fix had
- Water reflections are a bit off. The DX11 version uses a different technique to DX9. We will look further at this.
PREVIOUS DX9 FIX
================
Fixed:
- Shadows
- Lighting (most of it)
- Water reflections
- Put cross-hair and Hud at depth
**UPDATE v1.6:
- Magic effects on ground are now rendered at correct depth
- Rain drops are now at correct depth
**UPDATE v1.6.2 By Helifax
- Updated Glyps
- Fixed broken HUD after game update
- Update some reflection issues
**UPDATE v.1.6.1
- Updated broken shader CRCs after TESO patch.
Added:
- 2 Presets for convergence and hud/cross-hair depth ("0" ).
Known Issues:
- Some specular lighting issues on rooftops, especially when raining
- Specular lighting on windows
Summary
Out the box this game does not look too bad in 3D, just lots of things are a "bit wrong" so it all adds up. However, lighting effects in indoor levels (like caves with fires and torches) are completely messed up. This fix addressed most of these issues.
Installation
1. Download this file: https://s3.amazonaws.com/Mike_Ar69/TESO_helixfix_v1.6.2.rar
2. Unzip into the "client" directory, which for me is C:\Program Files (x86)\Zenimax Online\The Elder Scrolls Online\game\client
3. Run the game
To get 3D Working in DX9 mode
Thanks to Zulunia for documenting this in the comments :-)
After the instructions above you need to do 2 things to get 3dvision, make the game run in a different nvidia profile and run in DirectX 9
Open Nvidia Inspector, click the tool icon to the right of 'Driver Version'
Search for the Elder Scrolls Online profile
Click the icon with the red X and remove 'eso.exe' application
Search for the World of Warcraft profile
Click the icon with the Green + and add application 'eso.exe'. Should be in your "\The Elder Scrolls Online\game\client\" folder
This makes ESO use the World of Warcraft NVidia Profile
Next is to set ESO to run in DX9
Open UserSettings.txt which is located in your "*Documents*\Elder Scrolls Online\live\" folder
Locate (If it's not there, add it)
SET GraphicsDriver.7 "D3D11"
and change to
SET GraphicsDriver.7 "D3D9"
This runs the game in DirectX 9
Finally - in Nvidia control panel, you need to "Set when the display is in 3D mode" to be "Only while 3d programs run". If that does not work, then you need to set it to "Always".
Presets
I provide two presets, each of which has two parts to it: (a) convergence and separation values, (b) a toggle key for hud/cross-hair depth. In game press the "0" key to toggle between them. By default the game will be high depth, low convergence, with a deep cross-hair and slightly in depth HUD. the alternative is Low depth, high convergence with low depth cross-hair and HUD popping out a bit.
To change convergence and separation, switch to the preset you want to change with the "0" key, change conv/sep and then press "F7".
To change hud and cross-hair depths is more involved (for now):
1. Open the A8BE42F2.txt Vertex Shader file from ShaderOverride\VertexShaders:
2. Look for these values at the top:
//Low depth high conv (x= hud shift, y=x-hair shift
def c202, -15, -2, 0.0, 0.0 <==CONSTANTS TO DEFINE THIS PRESET
//High depth low conv
def c203, 0.1, 0.9, 0.0, 0.0 <==CONSTANTS TO DEFINE THIS PRESET
3. So to change how it looks for you modify as follows:
c202/3.x = depth of HUD (positive is in screen, negative is out of screen)
c202/3.y = depth of cross-hair
Ultimately the mouse cursor is at screen depth though, so moving the hud too far in or out can make selecting things tricky. If I have time I might specify these values in the DX9Settings.ini
Friday, May 12, 2017
Syndrome [DX11]

- Use <Q> key to enable/disable crosshair
Use <Tab> key to toggle 10 crosshair depth presets
Installation:
- Download this ZIP file and extract the contents into the game directory.
Use Nvidia Inspector to assign the game's EXE (syndrome.exe) to the profile "3D-Hub Player". (For instructions on how to assign profiles, see this guide)- Override "Vertical Sync" to "Force on" via Nvidia Inspector or via Nvidia control panel in
"3D-Hub Player""Syndrome" profile - Set Video Settings to maximal level
If you like this mod, please consider supporting DarkStarSword on Patreon
In case it is helpful, here is also 4everawake's DX9 fix: DX9 3d_fix_Syndrome.zip
Tuesday, May 9, 2017
Homeworld Deserts of Kharak [DX9] + [DX11]

DX 9 Version (helix):
Use <Tab> key to toggle 4 HUD depth presets (you can change values in VertexShaders 1D29A48C.txt, 5B78329C.txt, 6AEB3DDF.txt in "def c251, 0.9, 0.8, 0.7, 0.6" string)
Use <Tab> key to toggle 4 HUD depth presets (you can change values in VertexShaders 1D29A48C.txt, 5B78329C.txt, 6AEB3DDF.txt in "def c251, 0.9, 0.8, 0.7, 0.6" string)
Installation:
- Download this ZIP file and extract the contents into the game directory.
- In your Steam library, right click on "Homeworld Deserts of Kharak" and select "Properties"
- Click "Set Launch Options"
- In the box, type "-window-mode exclusive -force-d3d9" and click "Ok"
- If you use not steam version in desktop shortcut's properties in object field add ' -window-mode exclusive -force-d3d9' after 'DesertsOfKharak64.exe'.
DX 11 Version (3Dmigoto):
Use <Tab> key to toggle 10 HUD depth presets
Installation:
- Download this ZIP file and extract the contents into the game directory.
If you like this mod, please consider supporting DarkStarSword on Patreon
Monday, May 8, 2017
NieR: Automata - 3D Vision Fix

===========================================================================
NieR: Automata
===========================================================================
- I DIDN'T MAKE THE ORIGINAL FIX! I just picked it up and finished the rest!!!
If you are not sure this game is for you please see this Review
(No story spoilers! Consider it more of a "technical" review!)
===========================================================================
Fixed:
===========================================================================
- UI
- Shadows
- Lights & Compute Lights
- Compute Shading
- Various broken Decals and elements
- God Rays, etc
================
Authors:
================
- ishiki - Made the initial fix for the game
- SGSRules - Shadows fix
- 4everAwake - Fixed the yellow circle around the character
- 4everAwake - Mostly fixed the main title screen
- 4everAwake - Disabled the distortion effect from the small pop-up screen
- Helifax - Fixed the rest of the Main Menu
- Helifax - Fixed blood/oil decals and their variations
- Helifax - Compute Shaders related to lights at different angles
- Helifax - Compute Shaders related to light tiles and clipping (visible in Amusement Park for example and other "far" locations).
- Helifax - God Rays
- Helifax - Different Convergences and Modes on F1, F2, M, TAB keys
- Helifax - Nvidia Profile with SLI support and Compatibility Support
- Helifax - Packed this fix up and adder FAR support (version 5.6.5.8). Later version MIGHT work but not guaranteed!
- Big thanks to Bo3b, DarkStarSword and Flugan for creating 3DMigoto and this awesome wrapper that allows us to fix our favourite DX11 games in 3D Vision!
- NVIDIA for Creating 3D Vision as a tech!
- Everyone else who contributed to this fix in any shape or form!
Fix available here:
NieR: Automata - 3D Vision Fix
Link to fix file (nvidia destroyed the forum links):
NieRAutomata_v.1.8.rar
Cheers!
Helifax
Dungeons 2 [DX11]

Remained Issues: Blood (I can't neither find shaders nor change via game settings)
Installation:
- Download this ZIP file and extract the contents into the game directory.
- Use Nvidia Inspector to assign the game's EXE to the profile "3D-Hub Player". (For instructions on how to assign profiles, see this guide)
- In your Steam library, right click on "Dungeons 2" and select "Properties"
- Click "Set Launch Options"
- In the box, type " -window-mode exclusive" and click "Ok"
- If you use not steam version in desktop shortcut's properties in object field add ' -window-mode exclusive' after 'Dungeons2.exe'.
I made this using DarkStarSword's Unity template.
If you like this mod, please consider supporting DarkStarSword on Patreon
Friday, May 5, 2017
Sword Coast Legends [DX11]

Removed: black smoke in first scene, lights arround selected objects (appearing signature of object remained on hud depth)
Added: 10 HUD depth presets on TAB key
Added: 10 HUD depth presets on TAB key
Installation:
If you like this mod, please consider supporting DarkStarSword on Patreon
- Download this ZIP file and extract the contents into the game directory.
- Use Nvidia Inspector to assign the game's EXE to the profile "3D-Hub Player". (For instructions on how to assign profiles, see this guide)
- In your Steam library, right click on "Sword Coast Legends" and select "Properties"
- Click "Set Launch Options"
- In the box, type " -window-mode exclusive" and click "Ok"
- If you use not steam version in desktop shortcut's properties in object field add '-window-mode exclusive' after 'SwordCoast.exe'.
If you like this mod, please consider supporting DarkStarSword on Patreon
Scrap Mechanic (Early Access)
3D Vision Fix by mike_ar69
Fixed
1. Shadows.
2. Light reflections.
3. Godrays.
4. HUD pushed to depth.


Installation
1. Download this file.
2. Unzip all the individual files in the "ScrapMechanic3DMigotoRelease" directory here: [SteamLibrary]\steamapps\common\Scrap Mechanic\Release
Known Issues
1. The game is early access and does not have much content, or water, or anything complex, which may turn up in later releases
2. When exiting the game, sometimes there is a bug that makes the computer go really slow, and you need to log out and back in to Windows. Not sure if this is a game bug or a fix bug. To get 3DMigoto to load I had to turn on "allow_create_device=2" in d3dx.ini, so not sure if that is the issue.
Thursday, May 4, 2017
Disney Infinity 3.0 Gold Edition (DX11)
Fix:
- Shadows
- Lights
- Some Reflections (not all)
- Steam Haze
- 2D Objects (Fire, smoke, fog, others)
- HUD and Crosshairs
Presets:
- "O" Key or Xbox DPAD DOWN" to Cycle Modes (between Mode 0 and Mode 1), see notes
- "P" Key or "Xbox DPAP UP" to Cycle in Mode 0, There are 18 values por this presets. see notes
Mode 0: Variable corrections shadows-lights
Mode 1: Fix correction shadows-lights
NOTES, IMPORTANT:
This game have some very strange behavior with shadows/lights. For every chapter they change the FOV correction and there is not a single Constant Buffer that correct this globaly in the game. Every Chapter have a FOV correction in a specific Constant Buffer, so i made 2 Presets to cycle for each Chapter in order to correct shadows/lights. You can see screenshots, when you find the correct presets, the game looks perfect.
When you start a chapter, you will probably see the shadows/lights all wrong. Mode 0: Press "P" Key or Xbox DPAD UP" (cycle) until you see all the shadows/lights perfectly corrected. Now shadows/lights will be working fine for that chapter, even if the FOV change in that chapter (jump in a vehicle or starfighter, etc).
If you are on foot, and non of the presets for Mode 0 works....Press "O" Key or Xbox DPAD DOWN" to enter the Mode 1. This will only works fine on foot. When other chapter is loaded, press again "O" Key or Xbox DPAD DOWN" to enter Mode 0 again and cycle with "P" Key or "Xbox DPAP UP".
Sometimes you still see some Cinematics wrong, normally in the beginning when you still don't select the correction. And sadly we can't Pause in cinematics.
This is not the ideal, but there is not Constant Buffer that globaly fix the FOV correction in this game. I have dumped all the shaders, use Frame Analysis, etc.....no CB that fix this globaly.
TB and SBS Mode:
- The game support SBS/TB Mode using 3Dmigoto. Remove the ";" in the ;run = CustomShader3DVision2SBS in the [Present] section of the d3dx.ini. Default TB Mode. F11 to cycle.
- If you enable this mode and see a blue image, press CTRL+F11 (correct Frustrum)
Instructions:
- Extract where DisneyInfinity3.exe is located (\Disney Infinity 3.0 Gold Edition\)
- Start the game, when "Rundll32" prompt appear, press "Yes". This is for the Profile Override needed for this game.
Download
Screenshots
Read this topic about How i will release my fixes: HERE
** Do you like the fix? **
If you like the fix, you can donate to this PAYPAL account: dhr.donation@gmail.com
Thanks!
Wednesday, May 3, 2017
LEGO City Undercover (DX11)
Fix:
- Shadows
- Blob Shadows
- Lights
- Reflections
- Halos in effects
- HUD
Presets:
- " I" key toggle between user convergence and cinematics convergence
- "Xbox Back Button" toggle between user convergence and cinematics convergence
Notes:
- Disable motion blur
- I still don't finish the game, so if i found more issues i will update.
- If for any reason the game don't start in full screen, and/or 3D is not kicking in, uncomment this line in the d3dx.ini ;full_screen=1 (remove the ";")
TB and SBS Mode:
- The game support SBS/TB Mode using 3Dmigoto. Remove the ";" in the ;run = CustomShader3DVision2SBS in the [Present] section of the d3dx.ini. Default TB Mode. F11 to cycle.
Instructions:
- Extract where LEGOLCU_DX11.exe is located (\LEGO City Undercover\)
- Start the game, when "Rundll32" prompt appear, press "Yes". This is for the Profile Override needed for this game.
Download
Read this topic about How i will release my fixes: HERE
** Do you like the fix? **
If you like the fix, you can donate to this PAYPAL account: dhr.donation@gmail.com
Thanks!
Umbrella Corps [DX9]
After

The game is online shooter with short single 'experiment' mission from Capcom
Thanks to DarkStarSword for developing his Unity template
Installation:
Installation:
- Download this ZIP file and extract the contents into the game directory.
- In your Steam library, right click on "Umbrella Corps" and select "Properties"
- Click "Set Launch Options"
- In the box, type "-window-mode exclusive -force-d3d9" and click "Ok"
- If you use not steam version in desktop shortcut's properties in object field add ' -window-mode exclusive -force-d3d9' after 'uc.exe'.
If you like this mod, please consider supporting DarkStarSword on Patreon
SUPERHOT [DX11]
It's DX11 fix for the game version 2.1.01p. I don't know if it faster than DX9
Use TAB key to change 10 values of crosshair depth
Installation:
If you like this mod, please consider supporting DarkStarSword on Patreon
Update 12-17-19 (bo3b): Repackaged fix using DHR's Universal Unity fix with 3Dmigoto 1.3.16 x32 DLLs. Game was updated to 2018 version of Unity.
Use TAB key to change 10 values of crosshair depth
Installation:
- Download this ZIP file and extract the contents into the game directory.
- Use Nvidia Inspector to assign the <game_folder>/SH.EXE (not SUPERHOT.EXE) to the profile "3D-Hub Player". (For instructions on how to assign profiles, see this guide)
- Make desktop shortcut to SH.EXE
- In desktop shortcut's properties in object field add '-window-mode exclusive -force-d3d11' after 'SH.exe'.
If you like this mod, please consider supporting DarkStarSword on Patreon
Update 12-17-19 (bo3b): Repackaged fix using DHR's Universal Unity fix with 3Dmigoto 1.3.16 x32 DLLs. Game was updated to 2018 version of Unity.
Middle Earth: Shadow of Mordor (DX11) 3D Vision Fix
3D Vision Fix by mike_ar69 & bo3b
Special Thanks to DHR for additional shader fixes.
Special Thanks to helifax for UI tweak version.
Fixed
1. Shadows.
2. Lights.
3. Fog.
4. Smoke.
5. Fire.
6. Explosions.
7. Special effects.
8. HUD (partial).
9. Crosshair (Partial).
Known Issues
1. Disable Order Independent Transparency.
2. HUD is put at screen depth except for cross-hair.
3. Cross-hair fix defines a small area in the screen center and some other hud elements (like the map) are also affected.
4. Menus are mostly at screen depth except some parts which stick out the screen.
5. Sun rays are a bit wrong, but not too bad.
6. Particle effects are correct for normal gameplay and 19:9 aspect ratios, but are incorrect for the benchmark and when in wraith mode using the bow.
7. The game has some noticeable "triangle flicker" at the screen edges. This not to do with the fix.
8. We also know that some areas will have additional effects we need to fix, since we have not played the whole game yet.
Drivers and Performance
1. Game performs really well. We tested on non-SLI 770 and 760, and on SLI 760 and 770. Even with the non-SLI cards, performance was really smooth.
2. We recommend using 344.65 driver (and later).
3. Earlier drivers have SLI issues.
4. You might get a crash at launch on some drivers in SLI. If so, disable SLI for first launch so it can cache shaders, then re-enable it.
5. SLI scaling is excellent (near 100%).
6. We recommend "High" settings rather than "ultra". We can't find any noticable difference visually, but performance is much better on "high".
Screenshots


Installation
Steps:
1. Extract this zip file to the games exe directory. In my case this is J:\SteamLibrary\SteamApps\common\ShadowOfMordor\x64.
2. Play the game.
3. The first time you play it may take a minute to start as shaders get cached.
We've made numerous updates to the fix since our first one, and the link above is the best one at present. This includes a few more shaders to fix the final missions in the game, and adds some better UI management.
The UI changes a lot, and there are multiple ways to leave the menus. Automatically after you win a fight, via the buttons in lower left, escape key, or the key used to enter (like M for map). So, there is a good chance you will wind up back at game with the UI stuck at screen depth. As soon as you move with W key, it will be set back to game play mode.
If you really need to, you can use F3 and F4 to go to Menu Mode and Play Mode respectively. You probably want to set Play Mode with F4 when you are in Sauron's Army screen, as it looks great.
F2 is a cycle through multiple depths, so you can choose what you like. Once you get a preference, you might want to set that as the x item so it is default. Or feel free to edit the list to suit.
Use ` (back quote) key to alternate play/menu mode and max depth. This helps when something is annoying in the upgrade menus.
Presets:
- Esc: Put it in Menu Mode.
- M: Put it in Menu Mode
- W: Put it in Play Mode.
- RButton: Aiming override to put cursor to maximum depth.
- `: toggle play/menu mode, use while in menus.
- F2: Cycle through 8 depth variants, x = -0.3, -0.2, -0.1, 0, 0.25, 0.5, 0.8, 0.99
- F3: Put it in Menu Mode, which forces some UI to screen depth.
- F4: Put it in Play Mode, which allows UI to follow the current F2 depth.
x= UI depth in %, negative is popout.
z=1 is Play Mode, z=0 is Menu Mode.
w=0 for aiming crosshair, set to 1 when RButton is down.
----------------------------------------------------------------------------------
Older versions in case you have trouble with the primary one.
1) Early version, no keys: https://github.com/bo3b/3Dmigoto/releases/download/0.99.4-beta/3Dmigoto-Mordor-0.99.4.zip
2) 3-2-15 Helifax update: https://s3.amazonaws.com/bo3b/Shadow+Of+Mordor_latest_DLC.rar
I've added 2 presets on keys:3) Update 6-8-15: Shadow of Mordor 1.1.16 Beta.7z
Z - puts a low convergence (usable in Army menu)
X - puts low depth and low convergence (usable in all other menus)
4) 10-18-15: Latest version: Mordor_1.1.16_v2.7z
5) 5-4-17: Latest version: Mordor_1.2.57_v1.7z
Update to latest version of 3Dmigoto, including SBS/TAB support and Win10.
Update for driver 350.12: Game is at least partly broken, and may be unplayable. Cannot see any text in Sauron's Army screen, aiming flickers in and out, second-chance QTE is not always available. Works correctly on 347.52. Might be possible to fix this with an imported profile.
Update for driver 355.82: Seems to work again, assuming this problem is driver related.
Monday, May 1, 2017
Metro: Last Light Redux

3D Vision fix for Metro: Last Light Redux with extra graphics options.
Fixed
- Flashlight lighting on spider webs and smoke (not 100% right, but better than default). Thanks to DJ-RK for the shader code for the original game (even if I used a different correction).
- Dynamic crosshair and prompts.
- Some specular reflections, mostly, but with some drawbacks (see hotkeys section).
- Some lens flares are now at a less annoying depth (they were too close to the camera at usual convergence values). I didn't put them at exactly 100% depth, for a cooler effect.
Installation
- Download this file and extract its contents in the root folder of the game ("Metro Last Light Redux"), where "metro.exe" is. Use 7-zip for that.
- If you want to unlock convergence, you will need to edit your "C:\Users\YourUsername\AppData\Local\4A Games\Metro Last Light\SomeNumber\user.cfg" file and add the "r_dbg_stereo_auto_separation 0" line. That line will be deleted every time you close the game, but setting the file to read-only will make the game not save the notes you find. I also recommend increasing "r_base_fov".
- If you have unlocked convergence, you will need to use tesellation at Normal or lower.
Hotkeys
- F1: HUD depth presets.
- F2: experimental specular reflections fix. It will make bloom be at screen depth, so press F5 if you use this. I don't recommend using this reflections fix.
- F3: depth of field toggle. Disabled by default. Mey be more blocky when you enable it than without this 3D fix.
- F4: lens dirt toggle (only the light effects. Not water or blood). Not disabled by default.
- F5: bloom toggle. Not disabled by default.
- F6: HUD toggle. Not disabled by default. It will also disable more than the HUD as a side effect, like prices on plates.
- Right mouse click or left trigger (hold type): temporal low convergence, for better aiming.
If you liked the fix and want to contribute for more future fixes, you can donate to this PayPal account: masterotakusuko@gmail.com
What Remains of Edith Finch (DX11)
This is an AMAZING game. I play the entire game in one session (is 3h long), can't stop playing...LOL
Fix:
- Shadows/ Lights
- Decals
- Halos in effects
- Lights Shaft
- Some reflections
TB and SBS Mode:
- The game support SBS/TB Mode using 3Dmigoto. Remove the ";" in the ;run = CustomShader3DVision2SBS in the [Present] section of the d3dx.ini. Default TB Mode. F11 to cycle.
Game Settings:
- Use Post Processing = LOW
- SHADOWS QUALITY = ULTRA
- AA = MEDIUM (if not the screen goes black)
Presets:
- "P" key and Xbox back button to toggle between 2 convergence value (1 for gameplay and the other for menus and play the comic part). default = high gameplay convergence, so the first menu will be very close at the screen.
Instructions:
- Extract where FinchGame.exe is located (\What Remains of Edith Finch\FinchGame\Binaries\Win64)
- Start the game, when "Rundll32" prompt appear, press "Yes". This is for the Profile Override needed for this game.
Download
Screenshots
Read this topic about How i will release my fixes: HERE
** Do you like the fix? **
If you like the fix, you can donate to this PAYPAL account: dhr.donation@gmail.com
Thanks!
Styx Shards of Darkness (DX11)
Fix:
- Shadows/ Lights
- Decals
- Halos in effects
- Lights Shaft
- 2D Sky lights
- Clouds and fog
- Fog and smoke position
- Disable DOF
- Outlines from objects
- HUD
TB and SBS Mode:
- The game support SBS/TB Mode using 3Dmigoto. Remove the ";" in the ;run = CustomShader3DVision2SBS in the [Present] section of the d3dx.ini. Default TB Mode. F11 to cycle.
Game Settings:
- Use Post Processing = LOW
- SHADOWS QUALITY = ULTRA
Instructions:
- Extract where Styx2-Win64-Shipping.exe is located (\Styx Shards of Darkness\Styx2\Binaries\Win64)
- Start the game, when "Rundll32" prompt appear, press "Yes". This is for the Profile Override needed for this game.
Download
Screenshots
Read this topic about How i will release my fixes: HERE
** Do you like the fix? **
If you like the fix, you can donate to this PAYPAL account: dhr.donation@gmail.com
Thanks!
Syberia 3 [DX11]
After

- added 10 HUD depth presets on TAB key (this gives to set cursor on panels accurately)
- removed wrong godrays from couple windows in first chapter)
Thanks to DarkStarSword for developing his Unity template
Fixed: - haloing, lights, shadows
Removed: light from balcony doors in hospital
Remaining Issies: water reflection in hospital fountain (can't find neither PS no VS), lights from windows (I should pass whole game to disable them all)
In game Options: - set Graphics to Beautiful
Installation:
- Download this ZIP file and extract the contents into the game directory.
- Use Nvidia Inspector to assign the game's EXE to the profile "3D-Hub Player". (For instructions on how to assign profiles, see this guide)
- In your Steam library, right click on "Syberia 3" and select "Properties"
- Click "Set Launch Options"
- In the box, type " -window-mode exclusive" and click "Ok"
- If you use not steam version in desktop shortcut's properties in object field add '-window-mode exclusive' after 'Syberia3.exe'.
If you like this mod, please consider supporting DarkStarSword on Patreon
P.S. There were problems with "HardSurfacePro Hidden Front Opaque Specular.shader.decompressed" in shaderassets51 so DSS's extract_unity53_shaders.py can't extract shaders. So I've omited that 60 shaders.
Subscribe to:
Posts (Atom)